Showing posts with label tutorial. Show all posts

2/22/2016

Tutorial: How to fix Footed Pajamas

Carter has a favorite pair of footed pajamas (we call them bunny suits does anyone else?) and when the zipper broke he was heart broken! I tried to say we could look for another one but that did not console him! I looked over the pajamas and realized they were in pretty good condition other than a faulty zipper so I decided to try fixing them, after all I couldn't mess them up anymore than they already were ;0)

I figured I may as well document it so I could share how easy it was for others, if it worked out, and thankfully it did work! Carter is one happy boy, and would wear them every night if I let him.

To start you'll need to examine the existing zipper. Turn it inside out and really look at the seams, especially at the bottom of the zipper. You'll notice that the zipper is very long, and it is probably serged on. Not to worry those are not big problems!

Starting at one end, it doesn't matter which unpick the serged seam that is holding the zipper on, do both sides. The bottom may be tricky just unpick it carefully and everything should be ok.

Now for the long zipper problem. On this pair of pajamas the zipper needed to longer than any zipper I could find, something like 42". I looked at my stash, and although I had long zippers I did not have one the length I needed. So I used the longest zipper I had which was about 25" long. I looked at the space Carter would have to get his legs in and that length would still leave plenty of room!

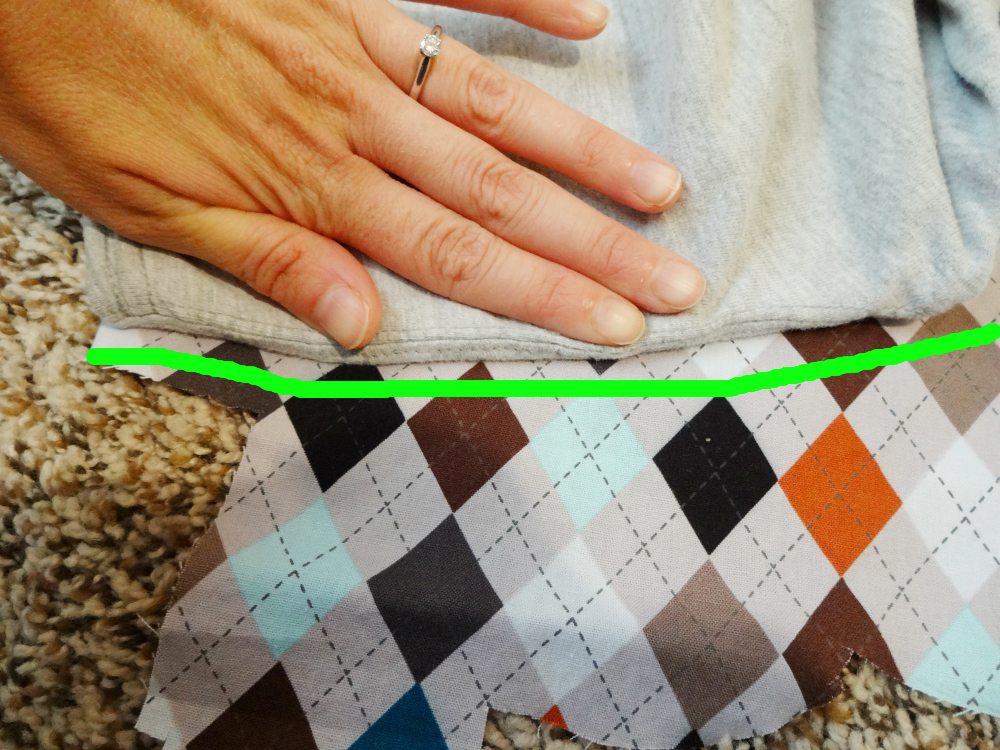
You will need to stitch a few lines along the bottom of the zipper so it doesn't' come undone while sewing it on. Then you will unzip the zipper all the way to that line of stitching you just made. Starting at the top of the neck opening, with the pajamas turned inside out, you will pin the zipper to the edge of the fabric. 

Make sure the zipper head is facing the right side on the back side of the pajamas like it the picture above. After pinning both sides you will then sew with a zipper foot as close to the zipper teeth as you can get. When you get to the bottom you will need to zip the zipper up a bit to get close to the teeth at the end.

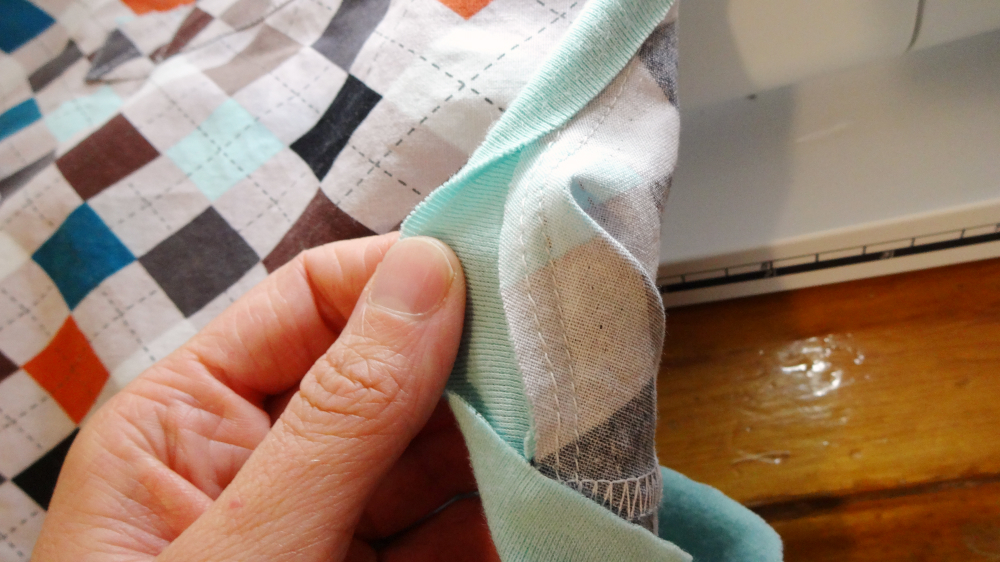
After you have sewn both sides you will need to reinforce the bottom. I did this by sewing about 2 inches along the bottom, as shown by the above photo. Watch the teeth if you are using a metal zipper, it will break your needle...ask me how I know ;0)

Walla! You are finished! It was actually an easy fix, right?! I was surprised that I fixed this in about 20 minutes which for an invisible zipper AND unpicking, is awesome!

Bonus: 
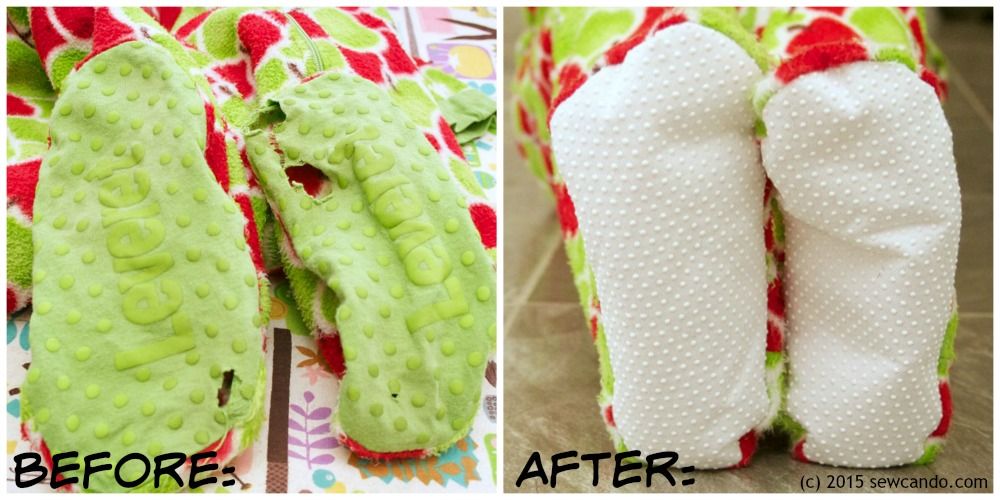
If you want to fix the feet of your footed pajamas check this tutorial out!

Do you just want to take off the feet? Then check this tutorial out!

1/12/2016

Keep that bedding on tutorial!!

My boys are constantly messing up their beds and it drives me crazy, in fact that is an understatement I get seriously upset! Now it wouldn't bother me if it was just unmade or if the blanket was on the floor but it is completely taken apart! Sheets, mattress cover, all of it off and undone in moments every, single. day. sigh.....With that in mind I decided I needed to create or buy something that was easy for them to make and not easy to take off.  


 Bunkbed bedding (aka: bunkbed snuggler, endcap, hugger, whatever you call it) is what came up again and again in my searches but they were sooo pricey! Not to mention I didn't like any of the color choices available. Besides I liked the quilts we already had so I thought maybe I could make them! And thus this tutorial was born ;0)
 
This was their beds before and this is how they look now, most of the time ;0)


Onto the tutorial!
Bunk Bed Bedding Tutorial

 First step is to measure how thick the mattress is. Start at the bottom where the back/bottom of the mattress rests on the bunk board or your bed, go to the top of the mattress and write this measurement down. My mattress measured 9 inches.

Next measure from one side of the bed to the other side (make sure it is the width you are measuring). Then you will measure the length ( the longest part), marking where you want the blanket to lay on your mattress/bed, clear down to the end of the mattress curving down with the mattress to where it meets the bunk board or bed. Write these measurements down and measure the quilt or blanket to see if it is the right measurement.

If it is not the right measurement (an inch or so off is ok) then you will need to cut off the excess.  When cutting leave 1" extra on the bottom and side where you plan to cut so you can finish the raw edges. Do this by folding over 1/2" and then fold 1/2" again or serge or zig-zag stitch the raw edges and sew in place.
You want the blanket to rest on the sides and end of bed without having the blanket hanging a lot lower than the mattress.
In order to make the blanket fitted at the end you will need to cut out a square at the bottom of your blanket. Cut out a piece of paper that is the measurement of your mattress depth squared. My mattress was 9 inches so I cut my paper in a 9 inch square or 9 inches on all sides. 
Line up your paper to the end corner of your bedding.


Cut out your square! Basically only two lines that meet in the corner.

You will now bring one corner to the other with right sides together as shown.

See how they are lined up so nicely? Pin together. Do the other corner and sew! 


You will need to serge or zig-zag the raw edges to seal off any fraying and it will help strengthen the seam as well.


Tada! You now have nice fitting bunkbed bedding! Which can be used for beds other than a bunkbed, it just helps the blanket stay in place a little more and makes it easier to make the bed. 

Does it work for keeping the blanket in place you might ask? While the blankets do not stay 100% of the time it has greatly reduced them coming off and sometimes they even stay on for a few days, in a row! All in all it has been a great thing and SO much better than seeing a huge mess every day! And the kids can make their beds a lot easier now!
Feel free to ask any questions!


11/10/2015

Tutorial Tuesday:Making a woven t-shirt tutorial

I've been playing around with woven shirts for a few years and I thought I'd share tutorial of one of them, aren't I nice? ;0)

Woven shirts can be so nice and fun when there are so many more choices available in most fabric shops!


 Here is the latest version of the woven t-shirt I've worked on.

This is one I made a few years ago for Preston and I LOVED this shirt so much <3 It fit perfect and looked so cute when he wore it. This shirt is a bit different than the tutorial I posted below but I thought the woven feel would still give you an idea of fabrics to use.

This is another version of the yellow plaid shirt above. As you can see a woven shirt is cute and it can be easier to find the fabric locally as well, which is another bonus!


On to the tutorial:

To start find a shirt that fits well and is somewhat loose. You will turn the shirt inside out and fold in half. Lay the shirt down on top of your fabric (also folded) so that the fold of the shirt is on the fold of fabric, as shown. 
You will now trace around the the shirt making a 1/2" seam allowance (or whatever you prefer) as you trace. Fold the sleeves following the curve as shown above.
For the neck trace where the neck binding attaches to the shirt and add a 1/4" seam allowance. You will need to fold and move the neck binding a bit at a time in order to trace onto the fabric.
Cut along your tracing lines.

Using your already traced shirt piece as a pattern cut out another bodice piece. Lining up the two pieces at the neck and shoulders cut one a bit lower at the neck for the front of the shirt, as shown above.

Now pout your two pieces together right sides facing each other and sew at the shoulders using a 1/2" seam allowance. 

Placket:
Now we are ready for the placket! In order to make this placket for the buttons I will transfer you to this tutorial, it is laid out very well and was better than what I would have done myself so head over here for this part.


For the sleeves lay it out and trace along the hew and under the arm piece until it meets the shirt bodice piece. Be sure to make 1/2" seam allowance as you go.

Now flip the shirt over the sleeve (so the sleeve is still touching the fabric and the bodice is on top of the sleeve) so you can trace the curve where the sleeve meets the shirt. Fold right along the seam line and trace leaving a 1/2" seam allowance.

Here is your sleeve piece all cut out!
Pin your sleeve in the center at the top as shown.


Using your pin marker on the sleeve line up the sleeve to the center seam where the shoulder pieces connect. After pinning sew using a 1/2" seam allowance.


I forgot to get a picture of this step so here a borrowed picture from my Button- up shirt tutorial.
Now line up the sleeve and sides of the shirt and sew using a 1/2" seam allowance.


You will some bias tape or knit ribbing for this step. To get the length measure around the neck starting at one end of the placket and going around to the next end.

Pin one edge of binding or bias tape right sides facing along the neck line and then sew using a 1/4" seam allowance.

Next fold over the binding to the wrong side.Sew right on the edge of the binding (where the neck and binding seam is) on the right side as shown.

TaDa! Your beautiful neck line! 
Now hem up your sleeves and the bottom of your shirt using the seam allowance you made the hem.

Add buttons and you are done! I like using the *Kam snaps I bought on Amazon but buttons look great too.

A cute and fun shirt for the boys or girls!


 Pin or share with your friends!


*Affiliate links

8/24/2015

Tutorial: Mens button-up shirt to boys

Hello friends! I feel as though I have fallen off the face of the earth the last few weeks, my instagram feed and facebook posts have been lacking lately. Its amazing how much news I gather from those sources and it really feels isolating when I'm not on them much, funny isn't it? I didn't use them my whole life and was fine but now...Anyways I digress, on to the post ;0)

I am going to show you how I resize a mens shirt to fit a boy! I don't know about you but between my husband and brothers I have a lot of shirts I can use to re-purpose for my boys. Which I not only like to do but it also saves money and helps the environment...somehow, I'm sure :0)


 Remeber the shirt I made Broc? Well Here is what I did to resize it and turn it into a boys shirt!
You'll only need a few basics to do this:
Pins
Sewing machine
Your child or whoever you are fitting it to
Thread

 
 First I cut along the side seams of the shirt starting at the hem and go up to through the hem of the sleeves. Then you need to try the shirt on inside out on your child.

I like to start with the shoulder where it meets the sleeve and pin where it fits good. remember to add seam allowance 1/2" is usually a good amount :0) I kind of forgot on this shirt and had to redo it so learn from my mistake ;0)


 Then  following your pins sew along the sleeve/shoulder seam.

 Try it on the shirt and make any adjustments necessary before cutting off the excess fabric and re-fit if needed.

  Now pin up the sides starting at the sleeve and down to the hem. Pin it so it fits a little loose, making sure to sew along your pin line.

Sorry I don't have a picture of this step.
Now hem the bottom of the shirt so it is the right length, try it on and cut where needed. Be sure to add an inch to whatever length you deiced. Now fold over half an inch, iron, fold another 1/2" iron then sew. Try the shirt on and see if it fits and if you need to shorten the sleeves, sometimes you don't need to but check it to be sure.

Put the shirt on and look at how nicely it fits!


Linking: tatertotsandjello,