Showing posts with label mending. Show all posts

2/22/2016

Tutorial: How to fix Footed Pajamas

Carter has a favorite pair of footed pajamas (we call them bunny suits does anyone else?) and when the zipper broke he was heart broken! I tried to say we could look for another one but that did not console him! I looked over the pajamas and realized they were in pretty good condition other than a faulty zipper so I decided to try fixing them, after all I couldn't mess them up anymore than they already were ;0)

I figured I may as well document it so I could share how easy it was for others, if it worked out, and thankfully it did work! Carter is one happy boy, and would wear them every night if I let him.

To start you'll need to examine the existing zipper. Turn it inside out and really look at the seams, especially at the bottom of the zipper. You'll notice that the zipper is very long, and it is probably serged on. Not to worry those are not big problems!

Starting at one end, it doesn't matter which unpick the serged seam that is holding the zipper on, do both sides. The bottom may be tricky just unpick it carefully and everything should be ok.

Now for the long zipper problem. On this pair of pajamas the zipper needed to longer than any zipper I could find, something like 42". I looked at my stash, and although I had long zippers I did not have one the length I needed. So I used the longest zipper I had which was about 25" long. I looked at the space Carter would have to get his legs in and that length would still leave plenty of room!

You will need to stitch a few lines along the bottom of the zipper so it doesn't' come undone while sewing it on. Then you will unzip the zipper all the way to that line of stitching you just made. Starting at the top of the neck opening, with the pajamas turned inside out, you will pin the zipper to the edge of the fabric. 

Make sure the zipper head is facing the right side on the back side of the pajamas like it the picture above. After pinning both sides you will then sew with a zipper foot as close to the zipper teeth as you can get. When you get to the bottom you will need to zip the zipper up a bit to get close to the teeth at the end.

After you have sewn both sides you will need to reinforce the bottom. I did this by sewing about 2 inches along the bottom, as shown by the above photo. Watch the teeth if you are using a metal zipper, it will break your needle...ask me how I know ;0)

Walla! You are finished! It was actually an easy fix, right?! I was surprised that I fixed this in about 20 minutes which for an invisible zipper AND unpicking, is awesome!

Bonus: 
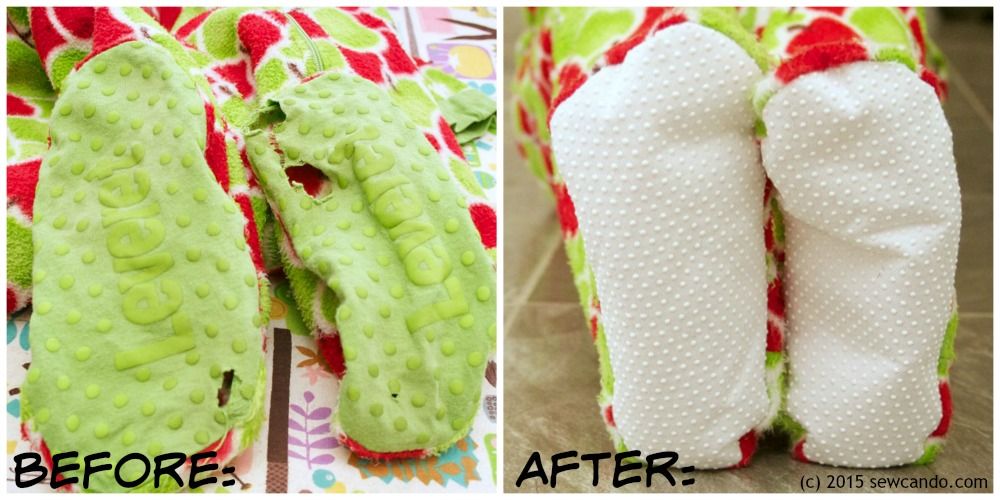
If you want to fix the feet of your footed pajamas check this tutorial out!

Do you just want to take off the feet? Then check this tutorial out!

4/14/2015

Tutorial Tuesday: Adjustable Waistband

It is Tuesday which means I am going to share a tutorial, also known as Tutorial Tuesday!

For today's tutorial I am going to show you how to make an adjustable waistband for shorts or pants that do not have one. It is very easy and anyone can do it; even if you can only sew straight lines you can do this!

*This post contains affiliate links to amazon*

What you'll need:
Elastic, either button-hole or knit 
Sewing machine and thread

First off we will be putting the bias tape and elastic from pocket or side seam on one side to the other pocket or side seam on the other side. so start by measuring from side to side and cut your bias tape accordingly, making sure to add about 1" extra.

Fold the ends under like so so the raw edge will not be out; or don't because when using bias tape it will not fray much because of the way it is cut, its completely up to you ;0)


Take your bias-tape and pin on the inside of the waistband, starting at the pocket or side seam (it doesn't really matter) all around the back side to the other side. You'll want to center it on the waistband as best you can.


Now if your shorts/pants have belt loops and you want to be able to use them, unpick the seam at the top of the waistband.

Then fold back and pin out of the way.

We will be sewing right on the edge of the bias tape.

Sew all along one side of the biastape and then sew the other side making sure to leave the ends open.


Now if you did not buy or have button-hole elastic we will go ahead and make some!
You will need Knit elastic to do this. The way it is weaved will make it so it will not unravel.

Taking your seam ripper cut, in between the lines, little button holes. I did mine about 3/8" long and did them about a 1/2" apart. do this all along the length of your elastic. It should be measured 2-3" longer than the bias tape you measured earlier.

Place a safety pin in one end and thread through the casing you made from the bias-tape.
Add a button at each end of the casing (about 1/2" away from the end of the bais-tape) and pull the elastic button-holes on the buttons! Use them just like you would sore bought adjustable pants!
*If you want to stabilize the elastic so it doesn't get pulled out, sew one seam in the middle through the elastic so it will stay in place.*

I hope you enjoyed this tutorial! Now you can add an adjustable waist in minutes to any pair of pants and it will look professional!


2/25/2012

Knee Pads

My Boys are Extra hard on pants these days so I tried Dana's Knee pad tutorial to make patches for their pants.


Even on my almost 7 year-old they look good and I get compliments on them quite often.

I did find I had unpick the side of the leg and sew it back together, much easier than trying to fiddle with it on my machine!

4/14/2011

Hole in the Knee

B has gotten soooo many holes in his pants this year! I needed a way to make them last and still look cute. I mean the rest of the pants are fine, except the knee!

Start with a scrap piece of denim, a sew-able iron on patch or some other sturdy fabric you have on hand. If you are using regular fabric you need to serge the edges or zig-zag them, so there won't be any fraying.

(not shown)Pin your patch where you want it on the inside, I just slip it in with my hand down through the waist and put it in place without turning inside-out.


Next wedge you pants under the needle, make sure you don't have the back of your leg under there too, you only want the top and your patch to be sewn. I usually unbutton the waist and wiggle the pants down to the knee. It may seem frusterating at first.
If you have a free arm on your sewing machine you will have a lot easier time than I did!

Flatten, make sure its straight and sew random lines. You can back-stitch if you want when you reach where you want to end, or you can put the needle down into the fabric and turn.


See all the random lines and how I went all over? I try to stay with in the size of the patch underneath.


Feel free to do as many lines as you want! I usually do more but we were running late for school so this had to do ;o)


Here are some I made for my little sis. She wanted gingham fabric for her patches for a more fashioned look. I had to use 4 layers to make it more sturdy, we also used red thread to sew the lines. I wish we would have done more lines....Oh well!