11/29/2015

2 year pictures and baby pants

Good morning! How was your Thanksgiving? How was your weekend? We had a very much needed break visiting my in-laws in Nevada all of last week and came home late Saturday. We had a blast hiking and going to a chocolate factory (well sort of, the kids didn't do that great and it was not what we expected at all). Now back to reality. Isn't that the hardest part of a vacation?

 Anyways back to the post! A few weeks a go I had my sister help me take pictures of Parker for his 2nd birthday (even though its in January) since the weather was nice and I had made him some cute new pants (more on them at the bottom), I am very happy with how they turned out!


 He is at the fun age where he is starting to talk and do the cutest things, like kiss me over and over while squeezing my breath away or saying "No" when he means yes, haha! I am enjoying him more than my other kids at this age. I appreciate this age so much more than I used to, I mean the time is short when they are so innocent and little, they change so much so quickly! I couldn't wait for my oldest 3 to grow bigger and not need so much help at the time.


My moms backyard was a perfect place for pictures and there were plenty of distractions to capture his attention from the camera, haha! Me and my little guy <3

 When we pulled down the tire swing he had a blast but it was difficult trying to get a picture while he was leaning on it and spinning around and around! Ok on to the pants!


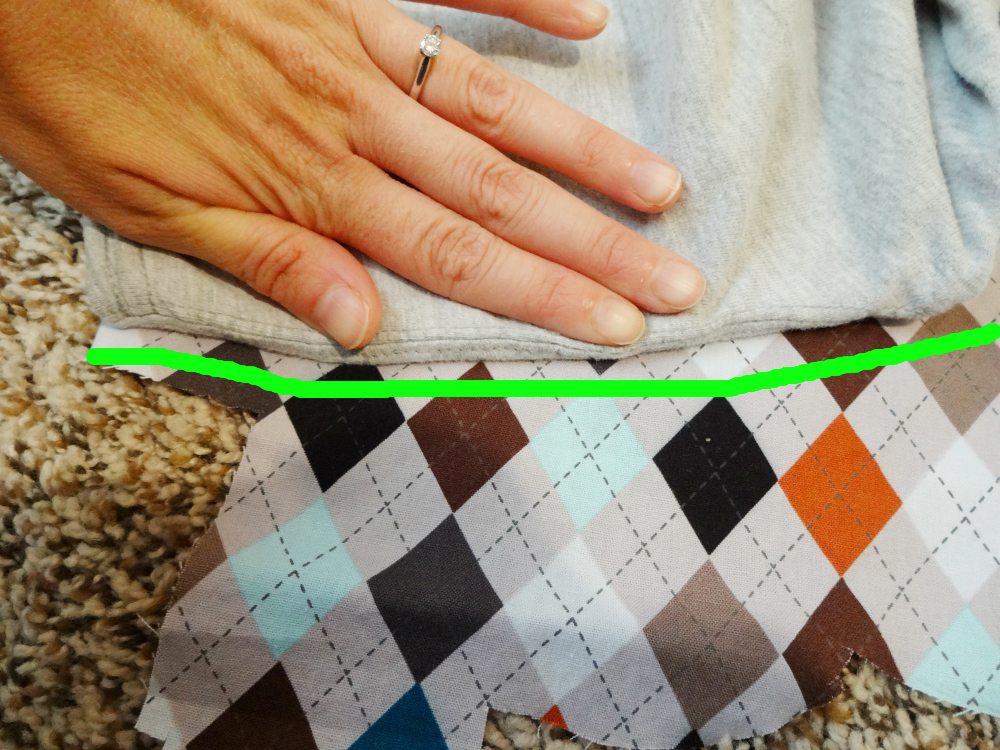
I have been using this pattern since Preston was little (here) and Really love it, it helps that it is free and one piece for front and back ;0) Its a wider straight leg cut which I love for this age since there is plenty of play room. They are also very easy to pull off and on for diaper changes. The size is 0-3 and 6-12 months, however Parker is in a cross between 18 months and 2T so I lengthen it in the legs by tracing down to the end of paper instead of the cuff line.

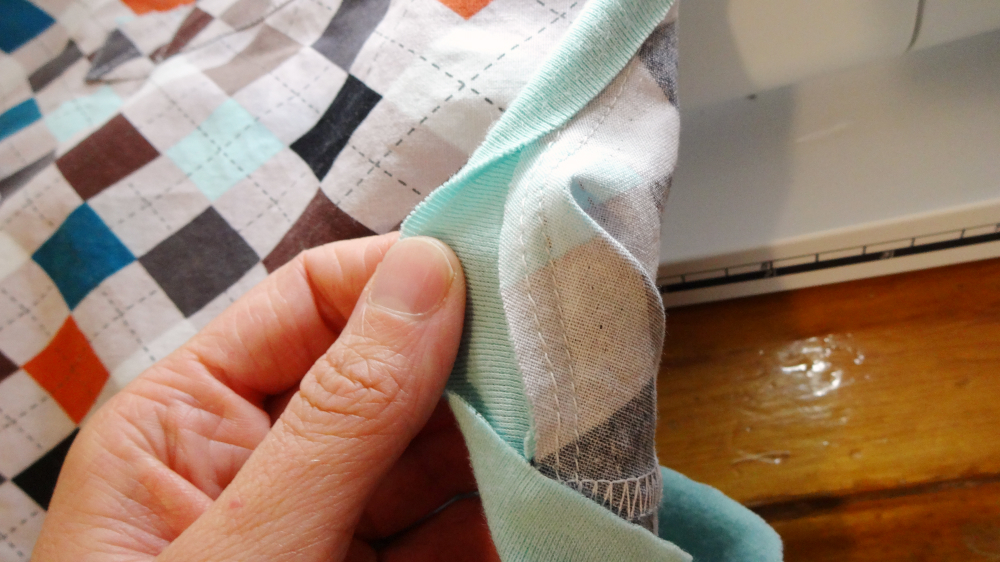
I always lower the front piece on pant patterns that use the same front and back by 1/2" so the front fits better but these look fine either way. I made up my own pocket pieces for the front and back by eyeing what I wanted. I used a flowery denim from Joann's but flipped them  inside out since I liked that side better.
So far I have made this boy 4 pairs of pants using free patterns ( two are here and here) and I'm very happy with how they turned out!


11/23/2015

Happy thanksgiving and a roll recipe

Happy Thanksgiving! 
We are gone visiting family and enjoying the warmer weather while we are gone! I needed this break in the worst way, it feels so nice to be gone from home and just enjoying being together, with no work or school!!!


I hope this Holiday is happy for you and if its not I hope you can find some peace in your life! 
I will be back next week with a real post but this week I am on vacation and not thinking about anything but pie and turkey and gravy and eating in general, haha!


 In the meantime you can always visit me on Instagram to see what we are up too I'm @seemesew on there so stop by! And I'll see you soon!
 
Ps. this is the best roll recipe ever, I have been wowing people with it for years and everyone always asks for more and the recipe, so if you are looking for that perfect roll recipe for Thanksgiving this is it!
                                
Sweet dinner rolls from allrecipes

Ingredients

If you don't have a bread machine follow these instructions:
1. Place warm water and yeast together stir and let sit for a few minutes.
2. Warm milk on stove till just warm (do not boil).
3. Mix egg, milk, butter and yeast mixture with 1 1/2 cups flour and mix with hand mixer or stand mixer for 10 minutes.
4. Let dough rest for 30 minutes.
5. Slowly mix in the rest of flour, hand kneading will be necessary at some point if using a hand mixer.
6. Divide dough in half. Roll each half into a 12 inch circle, spread 1/4 cup softened butter over entire round. Cut each circle into 8 wedges. Roll wedges starting at wide end; roll gently but tightly. Place point side down on ungreased cookie sheet. Cover with clean kitchen towel and put in a warm place, let rise 1 hour. Meanwhile, preheat oven to 400 degrees F (200 degrees C).
7. Bake in preheated oven for 10 to 15 minutes, until golden.  
 
Bread machine 
  1. Place water, milk, egg, 1/3 cup butter, sugar, salt, flour and yeast in the pan of the bread machine in the order recommended by the manufacturer. Select Dough/Knead and First Rise Cycle; press Start.
  2. When cycle finishes, turn dough out onto a lightly floured surface. Divide dough in half. Roll each half into a 12 inch circle, spread 1/4 cup softened butter over entire round. Cut each circle into 8 wedges. Roll wedges starting at wide end; roll gently but tightly. Place point side down on ungreased cookie sheet. Cover with clean kitchen towel and put in a warm place, let rise 1 hour. Meanwhile, preheat oven to 400 degrees F (200 degrees C).
  3. Bake in preheated oven for 10 to 15 minutes, until golden. 

11/10/2015

Tutorial Tuesday:Making a woven t-shirt tutorial

I've been playing around with woven shirts for a few years and I thought I'd share tutorial of one of them, aren't I nice? ;0)

Woven shirts can be so nice and fun when there are so many more choices available in most fabric shops!


 Here is the latest version of the woven t-shirt I've worked on.

This is one I made a few years ago for Preston and I LOVED this shirt so much <3 It fit perfect and looked so cute when he wore it. This shirt is a bit different than the tutorial I posted below but I thought the woven feel would still give you an idea of fabrics to use.

This is another version of the yellow plaid shirt above. As you can see a woven shirt is cute and it can be easier to find the fabric locally as well, which is another bonus!


On to the tutorial:

To start find a shirt that fits well and is somewhat loose. You will turn the shirt inside out and fold in half. Lay the shirt down on top of your fabric (also folded) so that the fold of the shirt is on the fold of fabric, as shown. 
You will now trace around the the shirt making a 1/2" seam allowance (or whatever you prefer) as you trace. Fold the sleeves following the curve as shown above.
For the neck trace where the neck binding attaches to the shirt and add a 1/4" seam allowance. You will need to fold and move the neck binding a bit at a time in order to trace onto the fabric.
Cut along your tracing lines.

Using your already traced shirt piece as a pattern cut out another bodice piece. Lining up the two pieces at the neck and shoulders cut one a bit lower at the neck for the front of the shirt, as shown above.

Now pout your two pieces together right sides facing each other and sew at the shoulders using a 1/2" seam allowance. 

Placket:
Now we are ready for the placket! In order to make this placket for the buttons I will transfer you to this tutorial, it is laid out very well and was better than what I would have done myself so head over here for this part.


For the sleeves lay it out and trace along the hew and under the arm piece until it meets the shirt bodice piece. Be sure to make 1/2" seam allowance as you go.

Now flip the shirt over the sleeve (so the sleeve is still touching the fabric and the bodice is on top of the sleeve) so you can trace the curve where the sleeve meets the shirt. Fold right along the seam line and trace leaving a 1/2" seam allowance.

Here is your sleeve piece all cut out!
Pin your sleeve in the center at the top as shown.


Using your pin marker on the sleeve line up the sleeve to the center seam where the shoulder pieces connect. After pinning sew using a 1/2" seam allowance.


I forgot to get a picture of this step so here a borrowed picture from my Button- up shirt tutorial.
Now line up the sleeve and sides of the shirt and sew using a 1/2" seam allowance.


You will some bias tape or knit ribbing for this step. To get the length measure around the neck starting at one end of the placket and going around to the next end.

Pin one edge of binding or bias tape right sides facing along the neck line and then sew using a 1/4" seam allowance.

Next fold over the binding to the wrong side.Sew right on the edge of the binding (where the neck and binding seam is) on the right side as shown.

TaDa! Your beautiful neck line! 
Now hem up your sleeves and the bottom of your shirt using the seam allowance you made the hem.

Add buttons and you are done! I like using the *Kam snaps I bought on Amazon but buttons look great too.

A cute and fun shirt for the boys or girls!


 Pin or share with your friends!


*Affiliate links

11/04/2015

Kid pants for the toddler

 I feel as though I have been far away the past couple weeks. We haven't gone anywhere and yet my posts here, on Instagram and Facebook have been sparse. There hasn't been a reason other than I just haven't felt like it.

Life has been busy with everyday life and most my time of late has gone into researching homeschooling stuff, that I usually don't even use, ha! Speaking of homeschool we have good days, bad days, days where I can't stand to homeschool anymore and then we get up and do it anyways. Its the flow of how things work in everyone's life, where you feel so tired of the routine but it still needs to be done so you push on to another day.


Our days have been cool and Parker had only 1 pair of pants and after making the last pair of Kid Pants I decided to make a few more!
They fit perfect and are exactly the fit I wanted for Parker!
I used the same technique as this pair but I did shorten these by 1" since Parker is on the small side ;0)

I really love free patterns and simple patterns which makes this project a win/win!